Encrypted tarballs with GnuPG and Tar

Introductions to GnuPG
GnuPG is a popular encryption and signing tool. Information on how to setup GnuPG (and the Pinentry utility) can be found here:
Basic encryption and decryption use cases with GnuPG can be found here:
GnuPG + Tar = gpgtar
The Tar utility is also a popular tool used for archiving.
Tar is derived from “tape archive”, as it was originally developed to write data to sequential I/O devices with no file system of their own. You can use the Tar utility to store files, and even directories, in a single file archive. A Tar archive is also commonly known as a tarball.
GnuPG is used to encrypt files, and Tar is used to archive directories into a single file archive.
So together, gpgtar combines the two popular tools, GnuPG and Tar, to create an encrypted tarball.
gpg-zip or gpgtar?
Earlier versions of GnuPG offered the gpg-zip utility instead of gpgtar. Gpg-zip is similar to gpgtar, but doesn’t have all the features of gpgtar.
# check if gpg-zip is available
gpg-zip --version

# check if gpgtar is available
gpgtar --version
But let’s deep dive on gpgtar, and investigate a workflow where:
1) a directory is placed into an encrypted tarball.
2) the key pair and encrypted tarball is relocated to another server.
3) the directory of files is extracted from the encrypted tarball.
Ciphers for an encrypted tarball
Before we create an encypted tarball, we need to decide the type of cipher to use. In GnuPG there are 2 types of ciphers available for encryption:
- public key cipher — good for sharing an encrypted archive with a group of people.
- symmetric cipher — good for keeping an encrypted archive to yourself and not sharing with others.
To use GnuPG, you’ll need to set the environment variables as appropriate:
# For the Bash shell, set the prerequisite environment variable
export GPG_TTY=$(tty)

# For the Fish shell, set the prerequisite environment variable
set GPG_TTY $(tty)
More detail of the cipher algorithms can be obtained from the version information of gpg.
# check the version of GnuPG installed, and list the cipher algorithms
# Note: depending on the distro, gpg may be an alias for gpg2.
gpg --version
gpg2 --version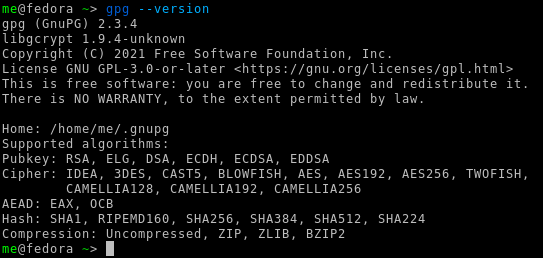
Either of these are available for a GnuPG tarball, so let’s examine how to create one of each.
Create a tarball with a public key cipher
A tarball with a public-key cipher is easy, with the critical step being that the recipient of the archive needs to be specified. For example, to create an encrypted tarball for myself, then I need to specify myself as the recipient.
If I have multiple key pairs on my key ring then I can also specify which user ID to use to do the encrypting.
Note — Previously, using ‘gpg — gen-key’, I have already created a GnuPG user ID named ‘example’, and a directory named ‘test’ that has two files.
In my example, I am going to encrypt a message for myself, so I specify the user ID of my public key (ie -u example) for the encryption and the user ID of public key for the recipient (ie -r example).
# Set the prerequisite environment variable (eg Bash)
export GPG_TTY=$(tty)
# Encrypt using a public-key cipher for a user example to user example
# Note: the encrypted tarball will be signed
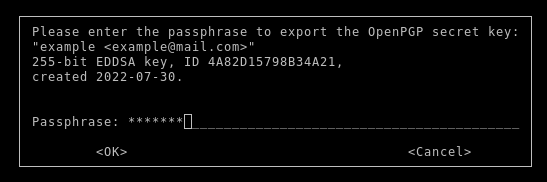
gpgtar --sign --encrypt --output test.gpgtar --gpg-args "-u example -r example" ./testAs I’m using a public key cipher with a secret key protected by a passphase, I’ll be prompted for the passphrase by the Pinentry utility.
After the encryption, the contents of the encrypted tarball can be examined:
# check the contents of the encrypted tarball
# Note - the -u argument is not required where only a single key pair is present on your key ring
gpgtar --list-archive --gpg-args "-u example" test.gpgtar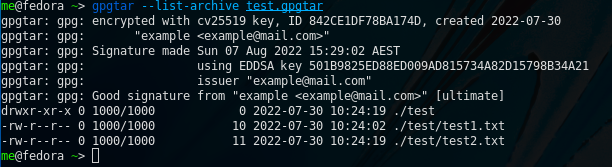
In the encrypted tarball, there is a test directory, containing 2 files named test1.txt and test2.txt.
Create a tarball with a symmetric cipher
A tarball with a symmetric cipher is also easy to create. For symmetric ciphers, unlike for a public key cipher, I don’t need to specify the user ID of the key pair nor the recipient.
Just specify the directory to archive the directory named ‘test’:
# Set the prerequisite environment variable (eg Bash)
export GPG_TTY=$(tty)

# Encrypt using a symmetric cipher
# Note: the encrypted tarball will be signed
gpgtar --sign --symmetric --output test.gpgtar ./test

# Note: if your GnuPG version does not choose the AES256 cipher by default,
# then you can explicitly specify it as follows
gpgtar --sign --symmetric --gpg-args \
"--personal-cipher-preferences AES256" --output test.gpgtar ./test
You’ll be prompted for:
- the passphrase to unlock the secret key, as the secret key will be used to sign the encrypted tarball.
- a passphrase to use for the encrypted tarball.
Note — it’s considered best practice not to create a passphrase for the encrypted tarball, that is the same as the passphrase that unlocks the secret key.
Now do a quick check to see what has been archived, and the status of the signature of the encrypted tarball.
# Set the prerequisite environment variable (eg Bash)
export GPG_TTY=$(tty)

# list contents of the encrypted tarball
gpgtar --list-archive test.gpgtar
Input the passphrase for the encrypted tarball, and then the status and the contents of the archive will be shown.

Notice that for the verison of GnuPG that I’m using, the default symmetric cipher used is AES256.
Always backup your key pair
Losing a secret key is catastrophic, and means you won’t be able to decrypt. It’s critical to backup the key pair, in addition to the encrypted tarball.
You could also create an active backup on a remote server, which means you can simply relocate everything to that server.
The steps would then be:
- export then import the key pairs to the remote server.
- retrust the owner of the key pairs on the remote server.
Export then import your keys
The most important step is to export the secret keys, and there are a number of ways to export and then import the secret keys. Exporting the secret keys will also include the public keys in the file.
Note — assuming you have already self-signed your public key. Otherwise you will have some problems using GnuPG with an unsigned public key on the remote server.
One way — but not the best way — is to export the secret keys in an ASCII-armor format (ie clear text). You may view the keys in this format by piping to a pager.
# Optional: inspect the keys in ASCII-armor format by piping to the Less pager
gpg --export-secret-keys --armor | less

# To export you'll be asked for the secret key passphase
gpg --export-secret-keys --armor --output secret.key.cleartxt
The problem with saving your key pair to clear text is that this may be considered as more of an invitation for a hacker to attempt to brute force the passphrase.
The best way to backup your keypair is to export the keys to a binary file. From there, copy the binary file to the remote server, then import the keys to an already present keyring.
# export the keys to file in binary format
gpg --export-secret-keys --export-options backup --output backup.key

# now secure copy the keys to the new server
scp secret.key me@192.168.1.198:
On the remote server, import the keys into GnuPG (assuming you already have a keyring present on the server).
# note: you'll be asked for the passphrase for the secret key
gpg --import ~/backup.key
With the keys imported to the remote server, you can verify what key pairs are present on the keyring.
# List all the public keys
gpg --list-public-keys

# List all the secret keys
gpg --list-secret-keys
The keys are imported but owner of those keys are defined as [unknown] by GnuPG.
Now trust the owner of the keys
On the remote server, I can display whether the keys are trusted:
# list all the public keys
gpg --list-keys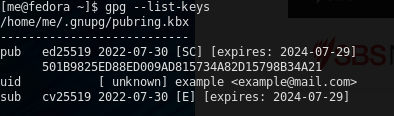
The information shown doesn’t indicate whether those keys that I just imported, truly came from the named owner.
Instead the [unknown] status is present.
I know the keys belong to me, but as the keys were imported from somewhere else, GnuPG assumes the owner of the keys is ambiguous. So I need to retrust the owner (ie myself) for my keys that were imported:
# edit your keys
# gpg --edit-key <persons_name>
gpg --edit-key example
Assign the trust level as ultimate as follows:
trust

5

save
Now I can list the details of the keys again.
gpg --list-keys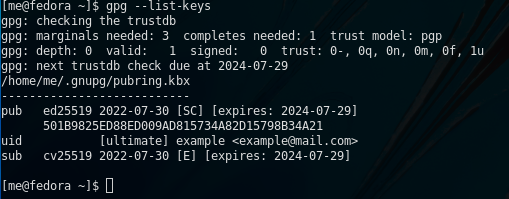
Now there is trust information for those keys. ie status is [ultimate].
Note — if the key pair was signed before the export of the keys then the key pair remains signed after the import.
Other public keys
If you have public keys from other people, then you can export these too, and also export the owner trust information. The owner trust information will be used for the trustdb database.
# If you have public keys from other people, then export their
# public keys, and their trust profile that you have stored.
gpg --export --output public.keys

gpg --export-ownertrust > otrust.txt
You can then import these files to the remote server.
Decrypt the tarball
Up to this point, we have exported and imported the key pair. Now we copy the GnuPG tarball to the remote server:
scp test.gpgtar me@192.168.1.198:List the contents of the gpgtar, just to check what’s inside:
# Set the prerequisite environment variable (eg Bash)
export GPG_TTY=$(tty)

# for public key cipher
gpgtar --list-archive --gpg-args "-u example" test.gpgtar

# for symmetric key cipher
gpgtar --list-archive test.gpgtar
The gpgtar was signed, so if the signature checks out we can choose to decrypt the tarball:
# Set the prerequisite environment variable (eg Bash)
export GPG_TTY=$(tty)

# extract the contents of the encrypted file
gpgtar --decrypt test.gpgtar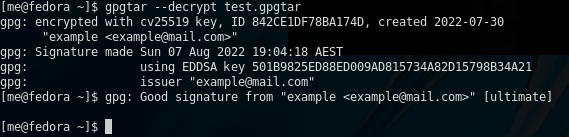
The origin directory, with the original metadata is extracted.
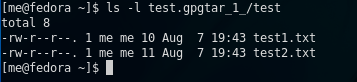
However the contents were placed inside a directory named test.gpgtar_1_, but that may not be the behaviour desired, as every time you decrypt, the contents is placed into test.gpgtar_2_, test.gpgtar_3_, etc.
To just place the extracted contents straight into the current directory, then specify the current directory as ‘.’ like this:
gpgtar --decrypt --directory . test.gpgtar
The beauty of a tarball is that the names of the members of the archive are hidden. The modified dates of the members are preserved, but also hidden in the archive.